
MOST RECENT BLOGS
Check out our video resources to learn more about the buying and selling process
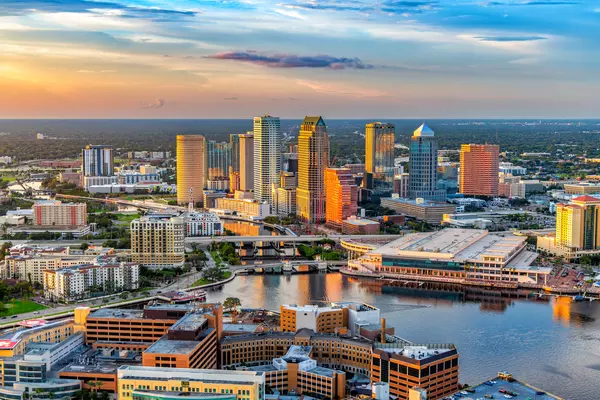
Tampa Bay Experiences Rapid Growth in Build-to-Rent Homes Over Last Five Years

Over the last five years, Tampa Bay has emerged as a leading destination for build-to-rent (BTR) homes, reaching its peak success last year. Across the U.S., 32 metropolitan areas have completed their BTR inventories over the past five years, yet more than half currently have no new projects in the
Read More5 Tips For An Easier Thanksgiving Cleanup If You're Hosting For the First Time

Thanksgiving is easily anyone's favorite holiday of the year. With each bite of the glorious roast turkey, spoonfuls of delicious mashed potatoes, gravy, and cranberry sauce, and even a slice of pumpkin pie, we are transported closer to Christmas and the spirit of giving. But with a great feast c
Read MoreDIYers, Here Are Expert Tips For Designing A Gallery Wall

What is a gallery wall? A gallery wall is a grouping or collection of paintings, photographs, art prints, and other personal treasures and items that are hung on a wall. Gallery walls are not just a decor trend but a decorating staple. They were able to stand the test of time simply because they are
Read More5 Biggest Plumbing Mistakes Many Homeowners Are Guilty of Making

You may not think much about it, but plumbing is an integral part of your home's systems. Plumbing issues such as dripping faucets, leaky pipes, running toilets, or frustratingly low water pressure do happen. Some of these may occur due to regular wear and tear. Unfortunately, some are downright res
Read MoreReal Estate 101: What Is The Difference Between Short Sales and Foreclosures?

For homeowners who fall behind on their mortgage payments, mainly due to a sudden financial crisis, such as unemployment and other income loss, unexpected debts, interest rate hikes, or economic downturn, among others — the two main options available are either a short sale or foreclosure. In both
Read More-

As the weather starts to warm up and the flowers begin to bloom, you might be itching to maximize your outdoor living space. Your backyard is an extension of your home and with the right additions, it can become a functional and relaxing oasis where you and your family can relax and enjoy the beauti
Read More Questions To Ask Before Hiring A Contractor For Your Home Improvement Project

Hiring a qualified and trustworthy contractor is one of the most crucial elements of a successful home remodeling project. But finding one isn't easy. Sure, you can ask for recommendations from friends and neighbors, even check online for reviews, but once you’ve put together a list of companies, wh
Read More5 Clever Ways To Maximize Your Closet Space and Keep It Organized

Whether you have a modest closet or a luxurious walk-in, you just have to be smart and creative when it comes to maximizing your closet storage. You also don't need to spend thousands of dollars to create a more decluttered, more manageable space for your clothes that add confidence to yourself ever
Read More7 Smart Tips To Keep Your Home Safe From Burglars This Holiday Season

It's the season of gifts, food, decorations, a lot of festivities, and of course- burglaries. Wait, what? Unfortunately, it’s the less cheerful reality of the holiday season. According to the FBI, 18 percent of home burglaries happen in December, and police only solve 13 percent of them. And if you’
Read More4 Ways to Avoid Going Over Budget on A Home Renovation

Whether you are renovating to make your space more comfortable, to increase your home's value, or just trying the style you always wanted from Pinterest, one of the biggest obstacles you can face when updating your home is staying within your budget. Budgeting for any remodeling project can be chall
Read More7 Ways To Minimize Unnecessary Costs When Moving

Whatever the reason behind your move, whether you're buying your first home, you’ve got a new job in a different city, or you want to be closer to your loved ones and relatives, among others, relocating is no small venture. There are many factors to consider: finding the time and energy to pack up a
Read MoreSummer Is The Best Time to Tackle These 5 Home Improvement Projects

If you're a homeowner, aside from lounging by a swimming pool or throwing a few backyard barbecues, the warmer months are also the perfect time to tackle some improvement projects around your house and yard. The beautiful weather conditions give you ample time to assess, repair, and make upgrades th
Read MoreWhy You Should Start Your Home Selling Journey By Decluttering

If you're planning to put your house on the market anytime soon, the biggest task isn’t to address repairs or start renovations, as these require lengthy planning since they can be time-consuming and costly. The main task you should prioritize as a potential home seller is decluttering. It’s actual
Read MoreThese 3 Organizing Tips Can Actually Cause More Harm Than Good

Searching for inspiration to help you organize your home isn't difficult nowadays. There is already an abundance of tips, tricks, and strategies from TV shows, magazines, and the internet to motivate you into taking on such a challenging task. The images of tidy closets or a perfectly organized pant
Read MoreDon't Forget to Look Up! The Importance of Having A Healthy Roof Over Your Home

A roof is one of the least thought of components of a home, but it's undoubtedly one of the most important. That lovely front porch or lush garden may be the first features that catch your attention when you drive by a home or during house-hunting. However, you shouldn’t fail to notice the roof as w
Read More-

Every homeowner is faced with a huge truth: their home's systems and appliances don’t last forever. Every major appliance has an average life expectancy, although it depends greatly on its usage and maintenance. And with many of us spending more time at home in recent years due to the pandemic, extr
Read More 9 Smart and Practical New Year's Resolutions for Homeowners

Most New Year's resolutions are about self-improvement—learning a new skill or hobby, eating healthier, or hitting the gym. If you’re a homeowner, it’s a no-brainer that you also want to improve your home and keep it in its best shape. Your living space has a much bigger impact on your life than you
Read MoreDo You Believe These Real Estate Superstitions?

The home buying and selling journey is a massive undertaking for anyone. It takes plenty of time, expertise, negotiation, patience, and sometimes, even a little bit of luck. And as far as luck goes, many follow these superstitions still, even when it comes to real estate. And since it's the season o
Read More7 Critical Steps to Take After Your House Is Damaged by Storm

The damage a storm causes to your home can leave you feeling lost and devastated. Concerns about securing your family's safety, restoring your property, and getting your life back together can be completely overwhelming. And with destructive storms becoming more and more common, it pays to have a st
Read MoreHomeowners, Make Sure You Leave These Repair Tasks To The Pros

There are several reasons why homeowners choose to DIY various home repair projects. It might be due to budget limitations, to save money, or just to enjoy a good challenge and proudly build sweat equity. However, substantial tasks are considered too technical, too difficult, or just too unsafe to b
Read More
Categories
Recent Posts